
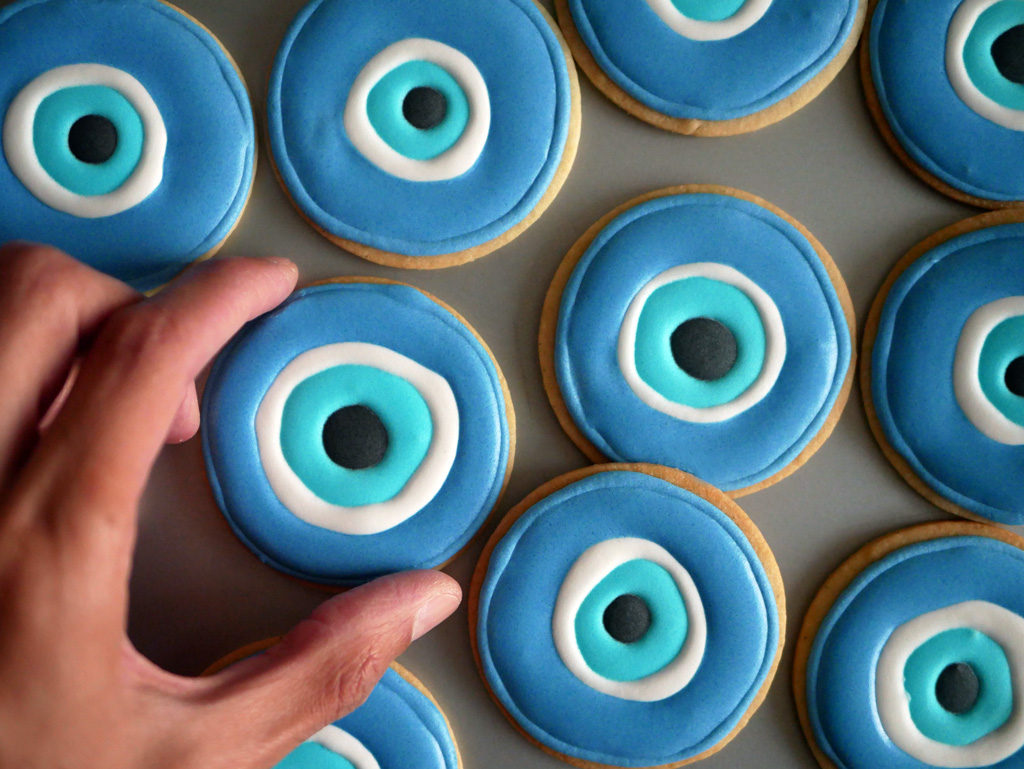
Evil Eye Cookies

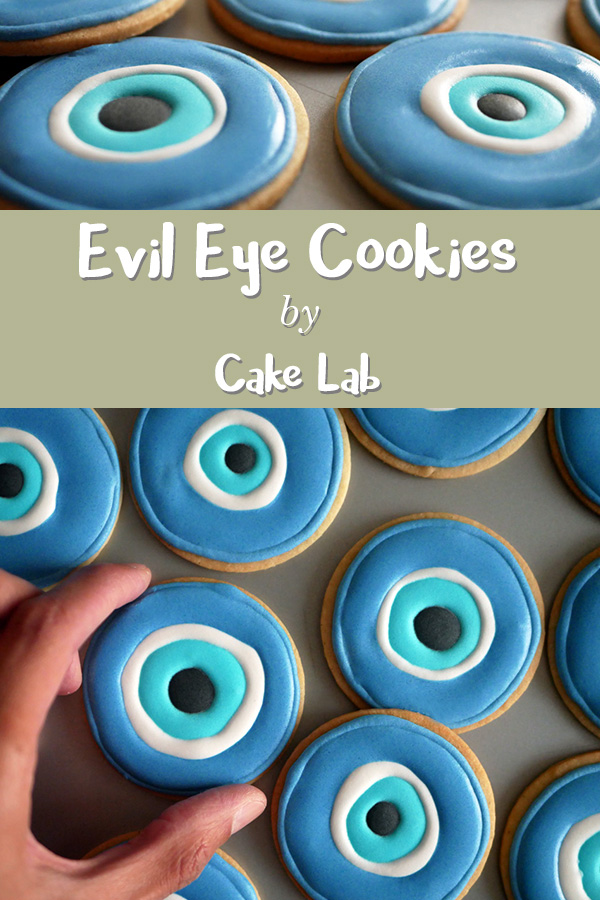
This week we celebrated my dad’s 68th birthday… almost 70! (tfu tfu tfu, against the evil eye). To celebrate it I made him a small birthday cake plus special cookies decorated with royal icing to keep away any bad luck from him this year: cookies against the evil eye, a concept deeply rooted in my family.
I don’t particularly believe in the evil eye or bad luck, but in my case you might say it’s like OCD. I knock on wood to fend away evil spirits, I don’t walk under ladders, I don’t leave scissors open or cut my nails at night, I don’t walk over my nephews and nieces (so as not to interrupt their growth God forbid) and so on.
Well, I’m not as horrible as it sounds. I have no problem whatsoever with black cats. But this whole bad luck thing is imprinted in my DNA. We call it “nakhs.” And yes, sometimes I do go through a nakhs day that is over only when I finally go to sleep at night.
Maybe it’s just chance, who knows. Unfortunately, these evil eye cookies didn’t keep bad luck away from me. When I came back home from my dad’s party, my new blender container flew out of my hands and shattered on the floor. In this case, as my mom likes to say, the nakhs has been broken.
Sure enough, if evil eye cookies don’t bring you good luck, they will at least satisfy your appetite. For a while now I’ve wanted to make decorated cookies and just didn’t have the time to look for a suitable royal icing recipe for the task.
Fortunately,
the first recipe I tried turned out so nicely that I didn’t have to look for another one. The recipe belongs to sally’s baking addiction and I’m keeping it forever.
True, my technique and execution still need some improvement, but it’s just the beginning. No matter what, it’s very fun. Just like drawing a picture, but the paint is sugar and the canvas is a cookie.
For a more precise drawing, the cookie must have a very flat surface. My cookies are not that flat, but they’re crunchy and tasty so I didn’t feel like making any others. Next time I’ll have to work on that too.
Some Notes
- While decorating the cookies with royal icing, you will have to replace the piping tips now and then. A coupler or two would make the job so much easier.
- It takes about 2 hours for the royal icing to dry at room temperature. I think this might affect the freshness of the cookie. That’s why I advise you to decorate the cookies as soon as they cool a bit, right after baking. It might also be possible to let the cookies dry in a covered tray to keep their freshness, but I didn’t try it myself yet.
- Royal icing not in use should be covered in plastic wrap. You can also keep it in the freezer up to two months and thaw it overnight in the fridge. Before use, bring the royal icing to room temperature.
- Michal’s tip: to restore the cookies’ freshness without affecting the icing, you can put it in a preheated oven to 50 °C / 122 °F for about 30-50 minutes.


Ingredients
Cookies
175 g flour
20 g almond powder
80 g powdered sugar
½ tsp salt
100 g cold butter (cut into cubes)
40 g egg yolk
5 g water (1 tsp)
1 tsp vanilla paste
Royal icing
480 g powdered sugar (4 cups)
3 tbsp meringue powder
8-10 tbsp lukewarm water
Gel-based food coloring (black, light blue, dark blue)
Equipment
Round cookie cutter, 7 cm in diameter
Pastry bags
Round piping tips: 2, 3 & 5 mm
Rolling pin
Toothpicks
The recipe makes about 16 blessed cookies
Cookies
Put flour, almond powder, powdered sugar, salt and butter cubes in the mixer bowl and keep in the fridge for about 10 minutes. Remove from fridge. Using the paddle attachment, start mixing at low-medium speed until the batter reaches sand-like consistency. Make sure the butter chunks are as small as possible at the end of the process without melting the butter.
Mix egg yolk, water and vanilla paste together and add to the mixer bowl all at once. Keep mixing at medium speed until the dough starts to form but is not yet completely uniform. Remove dough parts from the bowl and combine. Place the dough on parchment paper. Flatten the dough a little bit and lay another parchment paper on top.
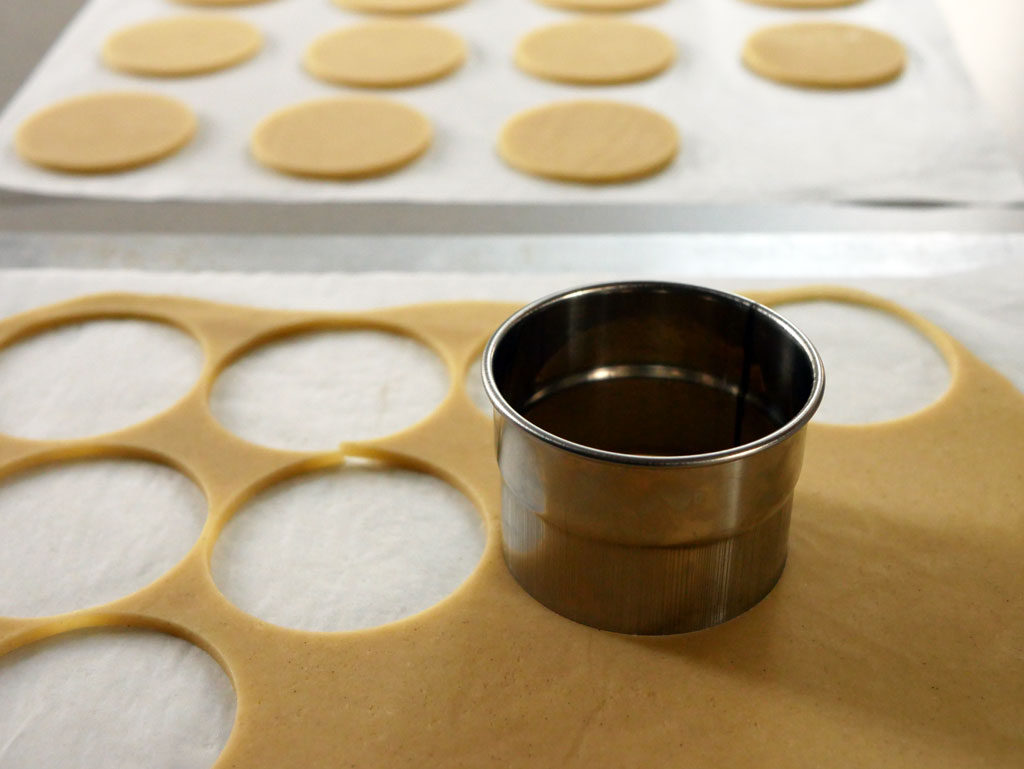
Roll out the dough with a rolling pin between the two parchment papers to a 3-4 mm thickness. Keep turning the dough throughout. Place the dough with the parchment papers on a tray. Keep in the fridge for at least an hour.
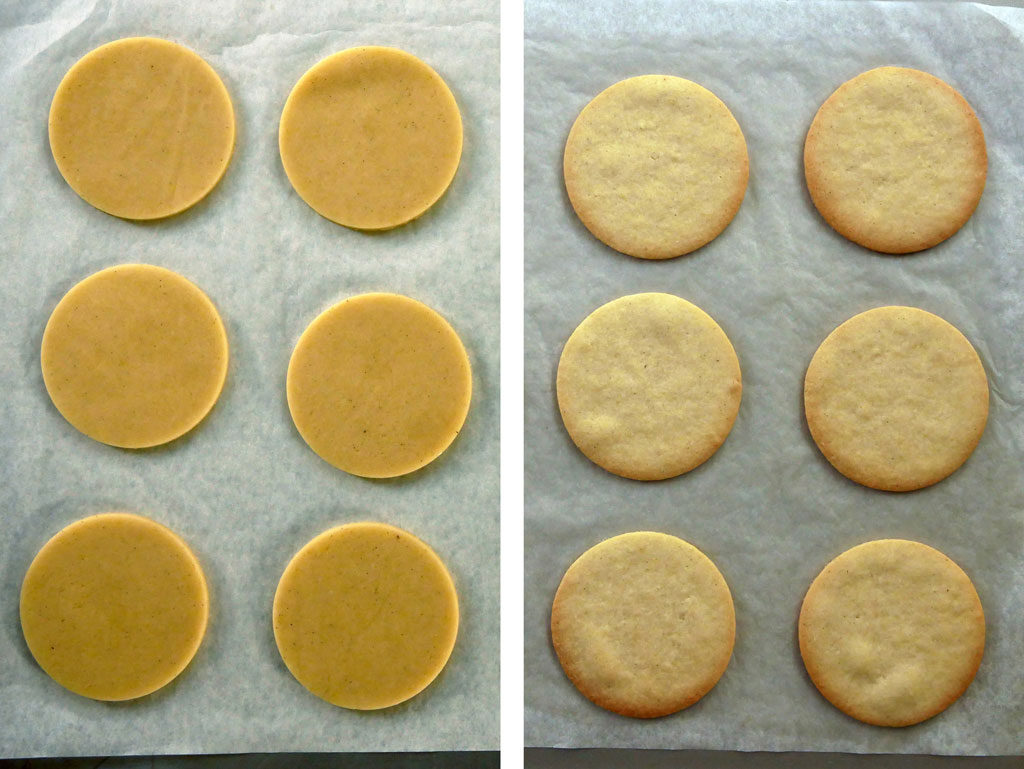
When the dough is stiff and cold, remove the parchment papers and place the dough back on one of the papers. In a cool room, using a 7 cm round cookie cutter, cut out circles from the dough. Keep in the freezer. Preheat the oven to 150 ºC (300 ºF).
Please note (!) If at any point the dough starts to soften, put it back in the fridge until it is stiff again.
When the desired temperature is reached, remove the cookies from the freezer and transfer them to another baking tray. Place the tray in the oven and bake for about 12-14 minutes, until the edges begin to brown. Remove from oven and cool at room temperature. Prepare the royal icing in the meantime.
Royal icing
Sift powdered sugar and meringue powder into the mixer bowl and add 8 tablespoons of water. Whip it all together on high speed for about 5 minutes. You should get the royal icing to ribbon stage. When you drop a spoonful of the mixture into the bowl it should fall back quickly in ribbons and disappear into the mixture after about 5-10 seconds.
If the royal icing is too thick, add a tablespoon of water and mix it. Keep adding water until you reach the right consistency. If it’s too watery, add more sifted powdered sugar. Royal icing that is not in use should be covered in plastic wrap.
Decorating the evil eye cookies!
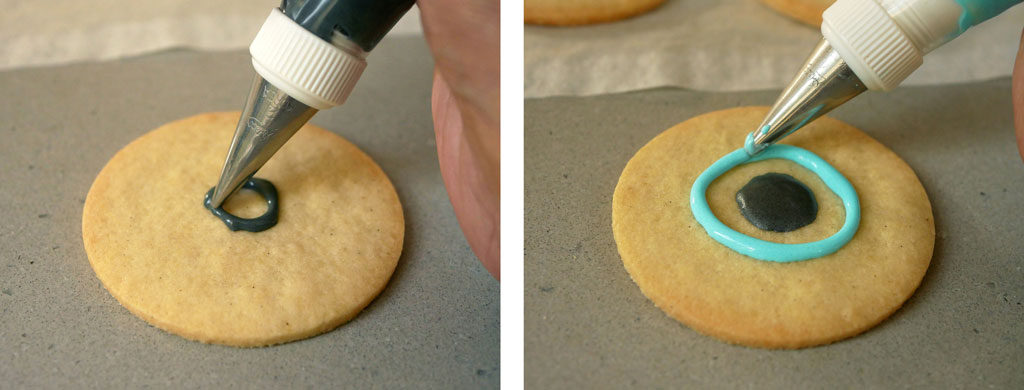
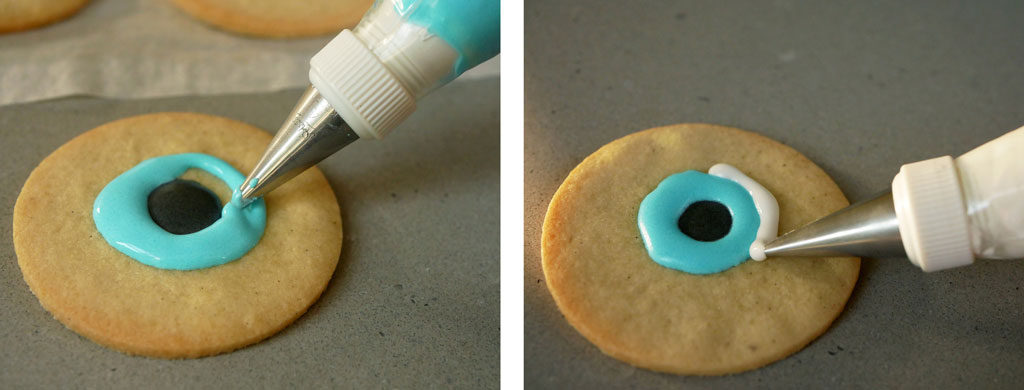
Transfer a small amount of royal icing into a small bowl. Add a few drops of black food coloring. Mix well. Fit a pastry bag with the smallest piping tip (2 mm) and fill it with the royal icing. Pipe a small black ring at the center of each cookie and fill it in with black icing.
Transfer a little bit more of royal icing into a small bowl. Add a few drops of light blue food coloring. Mix well. Fit a pastry bag with a larger piping tip (3 mm) and fill it with the royal icing. Pipe a light blue ring around the black circle and fill it up.
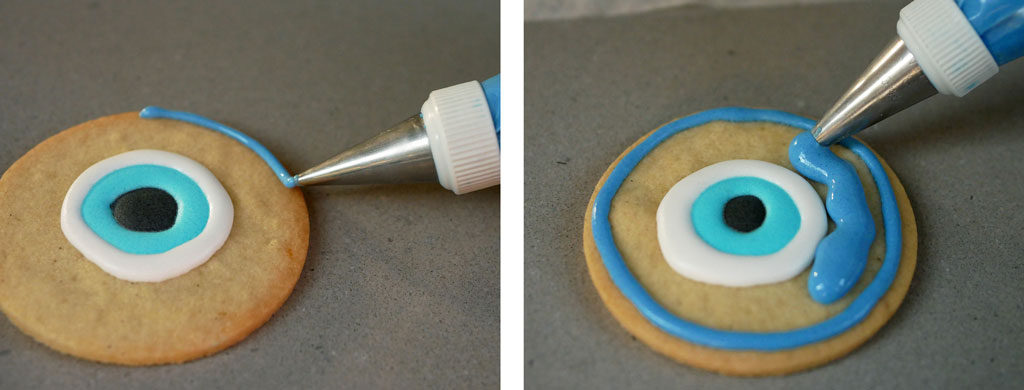
Fit a pastry bag with the same piping tip (3 mm) and fill it with white royal icing. Pipe a white ring adjacent to the light blue circle and then pipe another one around it.
Transfer royal icing into a bowl. Add a few drops of dark blue food coloring. Mix well. Fit a pastry bag with the smallest piping tip (2 mm) and fill it with the royal icing. Pipe a dark blue ring close to the edge of each cookie.
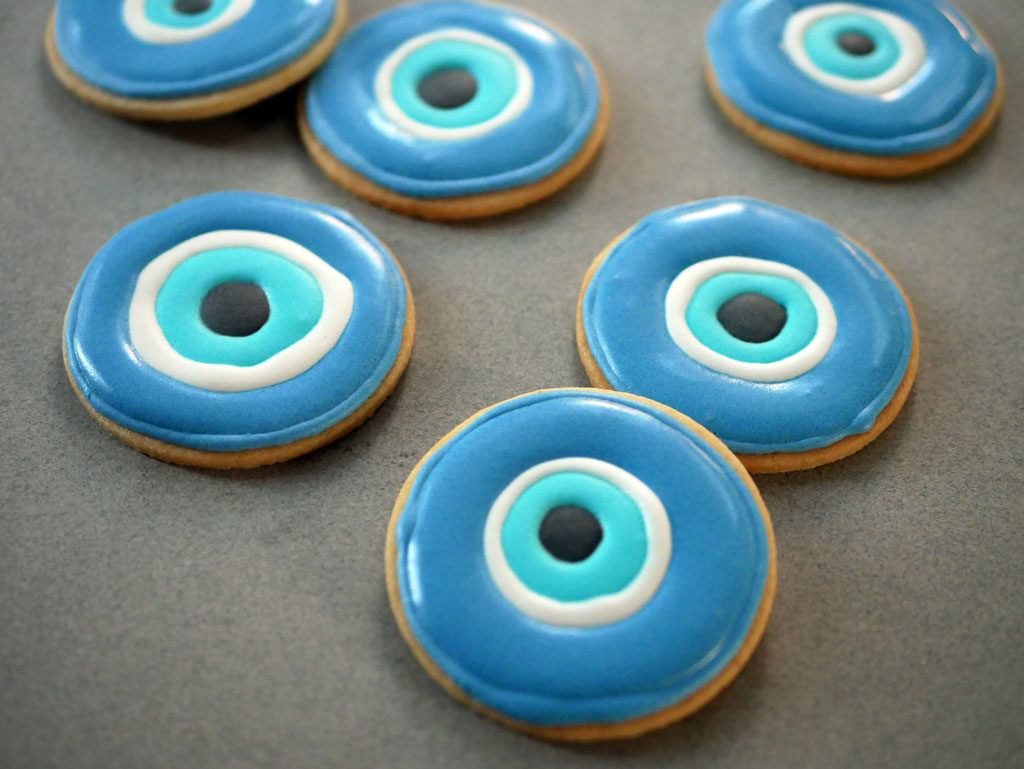
Change the piping tip to the largest one (5 mm) and fill in blue royal icing around the white circle. Lightly shake the cookie to spread the icing a bit. Use a toothpick to move the icing to fill up empty areas before it sets.
Dry
Let the royal icing dry at room temperature for about 2 hours. It might also be possible to let the cookies dry in a covered tray to keep their freshness, but I didn’t try it myself. I will update accordingly next time.
These evil eye cookies keep for two to three days in an airtight container at room temperature. You may freeze the rest of the royal icing up to two months.


