
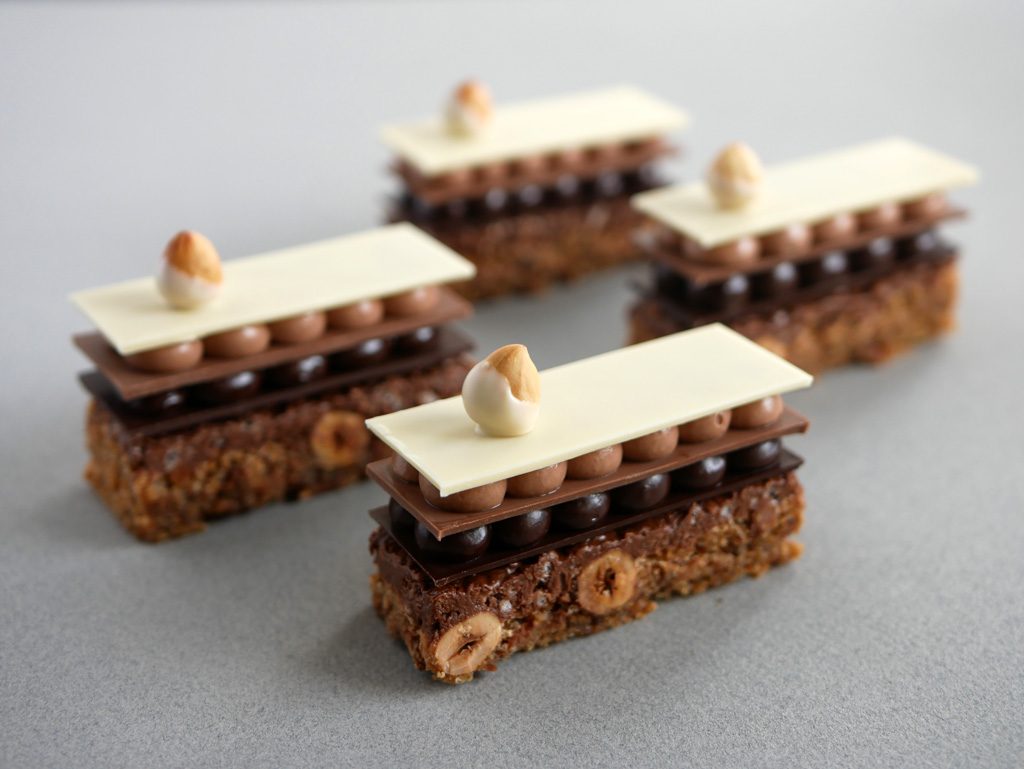
Three Chocolate Plaisir Sucré
The blog is still so young and I’m already writing another post about another brilliant creation by the French chef Pierre Hermé. This time it’s not about macarons. This time it’s about a cake that carries the name plaisir sucré, which means “sweet pleasure”. The chef couldn’t have chosen a more accurate name for this delicacy.
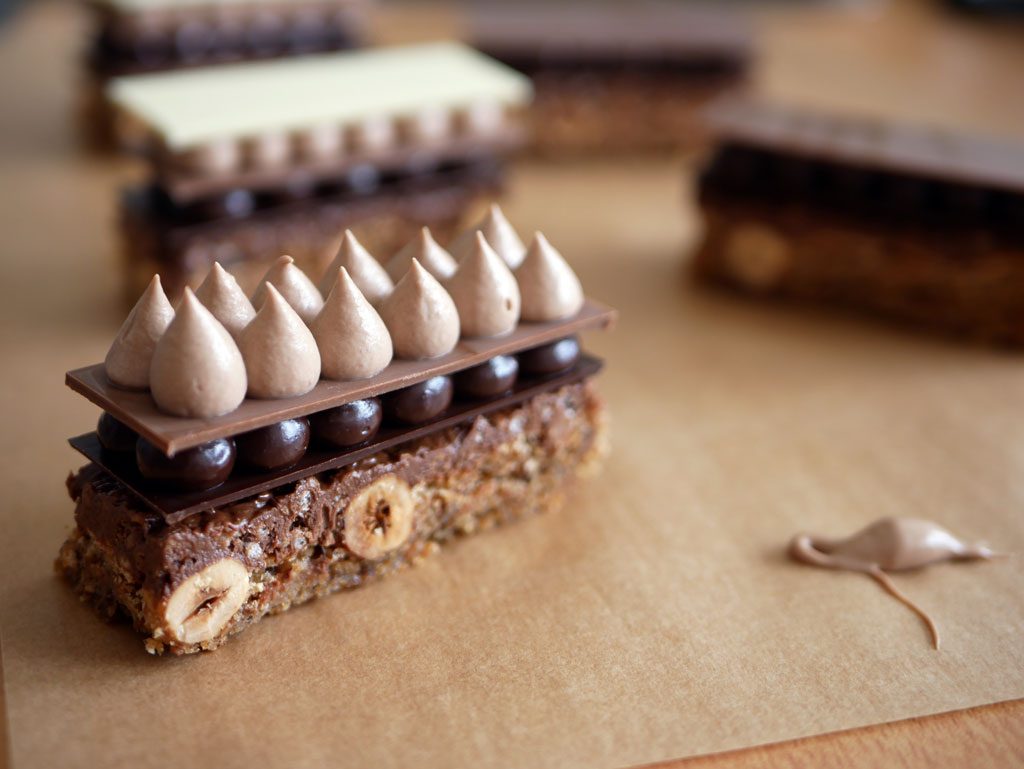
Plaisir sucré consists of 7 layers of happiness, with a small nutty decoration on top that was probably put to draw attention away from the great amount of chocolate that’s inside this tiny little cake.
In fact, this plaisir sucré is one of four cakes that are chosen as a final exam at the end of my pastry class at “Bishulim” school. I was hoping that it would be chosen for me, but I wasn’t lucky enough. Maybe it’s for the best, I’m not so sure it would have survived the wait for the examiners. It’s too tempting not to eat it.
Instead of using milk chocolate only, as is used in the original recipe, I decided to use all three varieties of chocolate (Dark, milk & white). This way I got a nice chocolaty color gradient from the base up. To do this, I had to temper three different types of chocolate (learn all about chocolate tempering in the previous post). If it seems like too much work (which it is), I suggest you pick your favorite chocolate and just work with it.
A note about pailleté feuilletine (caramelized crêpes flakes): You can find it in most specialty baking shops or you can make it at home. Buy round wafer sticks and crumble the outer crunchy layer that surrounds the filling. Also, you can make a gluten-free version of this plaisir sucré recipe if you replace the feuilletine flakes with puffed rice.


Ingredients for plaisir sucré
Milk chocolate chantilly
100 g milk chocolate
150 g heavy cream
Hazelnut dacquoise
105 g peeled hazelnuts
115 g powdered sugar
115 g egg whites
40 g sugar
45 g peeled hazelnuts
Hazelnut praliné feuilletine
75 g hazelnut praliné
40 g dark chocolate
15 g butter
40 g pailleté feuilletine*
Dark chocolate ganache
150 g dark chocolate
150 g heavy cream
15 g honey
Chocolate sheets
200 g dark chocolate
200 g milk chocolate
200 g white chocolate
(Or 300 g chocolate for one type of chocolate)
Decoration
10 peeled hazelnuts (whole pieces)
50 g white chocolate
Equipment
A square baking ring (size: 18×18 cm, height: 5 cm at least)
3 acetate sheets (size: approx. 40 x 30 cm)**
* Replace with 20g puffed rice for a gluten-free version.
** You can use plastic wrap instead of acetate sheets. The final product won’t come out perfect, but it’s not such a big deal.
The recipe makes 10 personal Plaisir sucré
Milk chocolate chantilly
It’s recommended to prepare the chantilly the night before. However, t’s possible to do it on the same day. If so, it should be put in the freezer for about half an hour to an hour, then moved to the fridge until it sets.
Break the chocolate into small pieces and put them in a measuring pitcher. Bring the heavy cream to a boil and pour over chocolate. Mix a little bit with a spatula and then use a hand blender to blend it to a uniform consistency. Pour into a bowl and cover the surface of the chantilly with plastic wrap. Keep in the fridge overnight.
Chocolate sheets
Take a flat baking sheet and wipe its surface with a damp towel. Place an acetate sheet (or plastic wrap) on the damp surface (moisture allows it to stick to the surface). Go over the top with a dry paper towel to remove air bubbles and to straighten it.
Temper dark chocolate. Once the chocolate is tempered, pour it to the center of the sheet. Using a large angled frosting spatula, spread the chocolate across the sheet (up a bit, down a bit, and then sideways) to get a thin and uniform layer. Avoid moving the spatula over the chocolate more than once or twice.
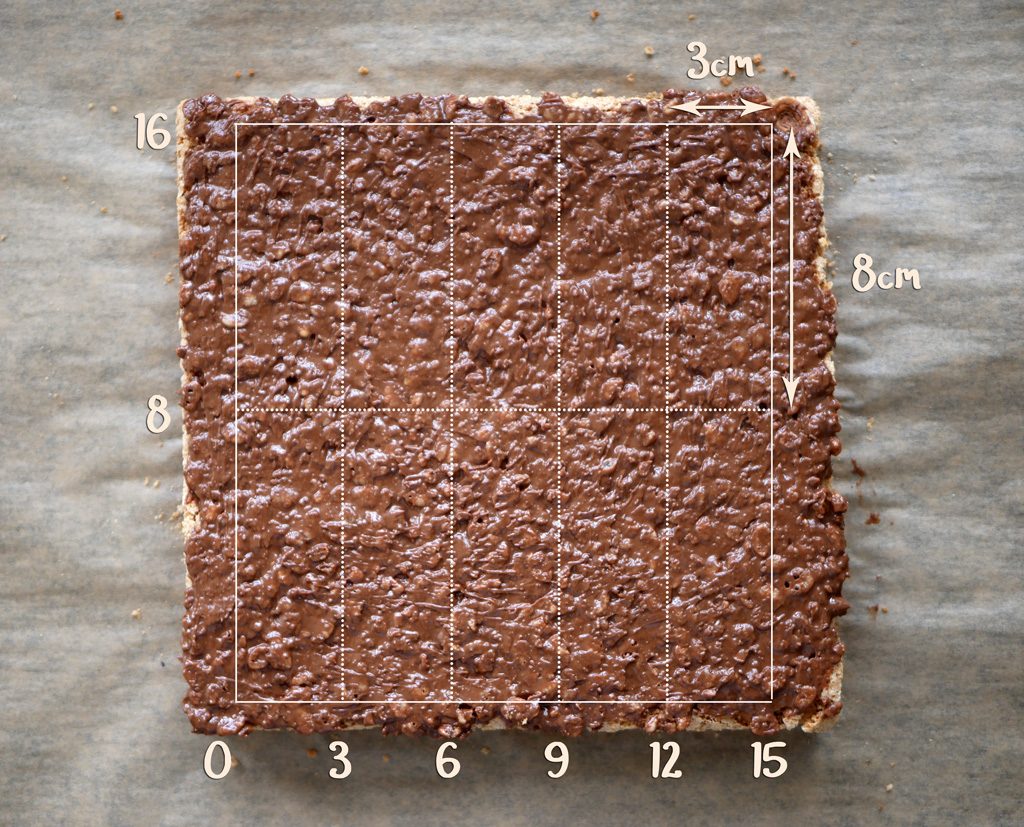
Give the chocolate a few minutes to set, just until it’s almost dry to the touch. Using a long ruler and a sharp knife, cut a horizontal line at the top and another horizontal line at the bottom. Make a small mark every 8 cm on each line and then cut lines connecting the markings. Cut a vertical line on the left side end and another vertical line on the right side. Make a small mark every 3 cm on each line and then cut lines connecting the markings. This way you get chocolate sheets the size of 3X8 cm.
Cover the chocolate with baking paper and place a large and a heavy book on top. This will prevent the chocolate from curling as it cools. Let the chocolate set at room temperature.
Repeat the process for milk and white chocolate, unless you decide to use one type of chocolate only.
Hazelnut dacquoise
Put 105 g hazelnuts and powdered sugar in a food processor and grind together for about half a minute until it becomes a powder. Be careful not to over-grind otherwise it will become hazelnut butter.
French meringue:
In a stand mixer, whip the egg whites on medium speed until thick white foam is formed. Keep whipping on the same speed and add sugar gradually. Once all the sugar has been added, increase the speed to high and whip until firm peaks.
Preheat oven to 165 °C (330 °F). Add a third of the hazelnut meal to the meringue and fold with a spatula. Add the rest of the hazelnut meal and continue to fold until uniform.
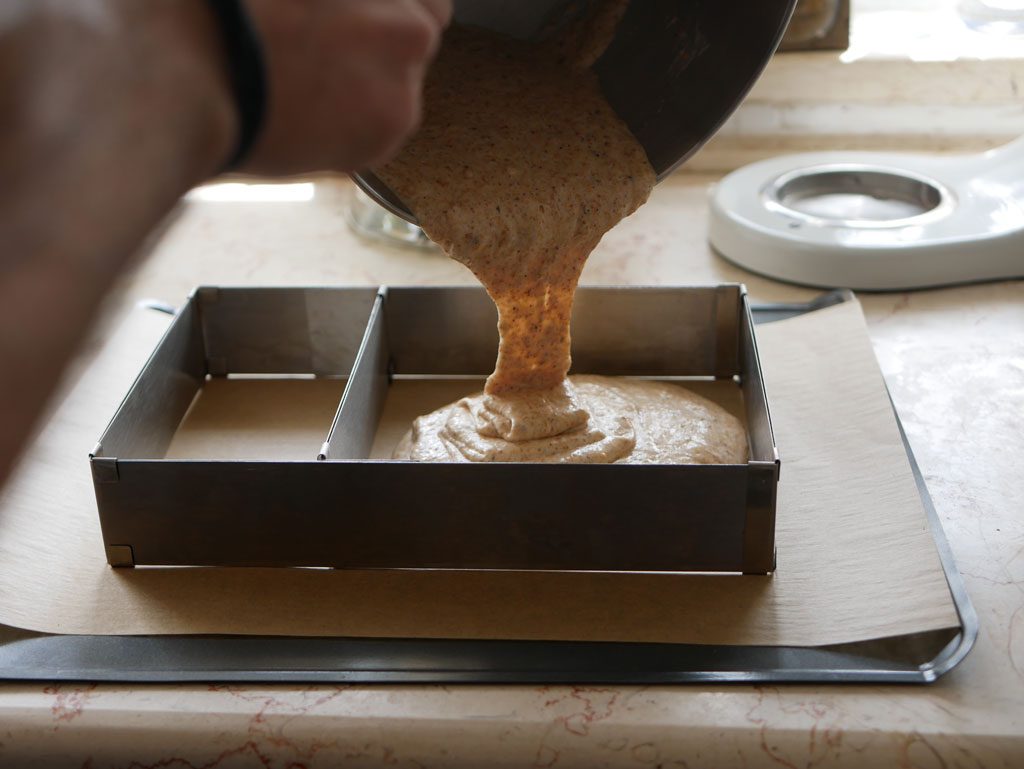
Line a baking sheet with baking paper and place the square ring on top. Transfer the batter into the ring and flatten the surface using a small frosting spatula. Distribute the rest of the hazelnuts on top. Put it in the oven and bake for 30 minutes, lower the temperature to 150 °C (300 °F) and bake for another 10 minutes.
Allow the dacquoise to cool for a few minutes outside the oven. Separate the dacquoise from the sides of the ring, preferably using a wide spatula. With a plastic card (or any flat tool that has corners) gently push the sides of the dacquoise down to flatten its surface. Leave the dacquoise inside the ring and let it cool completely at room temperature.
Hazelnut praliné feuilletine
Melt chocolate and butter together on a double boiler. Remove from heat, add praliné and mix well. Add the pailleté feuilletine flakes (or puffed rice) and mix again until uniform. Spread an even layer of it over the dacquoise surface. Keep in the fridge to let it set.
Dark chocolate ganache
Break the chocolate into small pieces and put them in a measuring pitcher. Put the heavy cream and honey in a saucepan. Bring them to a boil and pour over chocolate, making sure all the chocolate is covered. Mix a little bit with a spatula and then use a hand blender to blend it to a uniform consistency. Pour into a bowl and cover the surface of the ganache with plastic wrap. Keep in room temperature.
Do not keep in the fridge so it won’t harden. To speed up the process, flatten the ganache on a tray and cover with plastic wrap. If it’s still not stable enough for piping when the time comes, put in the fridge for about 5 minutes.
Put it all together!
Take the dacquoise out of the fridge and release it from the ring. Turn it over, remove the baking paper, and turn it back again. Similarly to the chocolate sheets, mark a horizontal line at the top and another horizontal line at the bottom. Make a small mark every 3 cm on each line and then mark lines connecting the markings. Mark a vertical line on the left side end and another vertical line on the right side. Make a small mark every 8 cm on each line (which is basically just one mark in the middle) and then cut a line connecting the markings.
Using a large serrated knife, saw the crunchy layer along the marked line and then cut the bottom layer with one stroke.
…
Back to the chocolate sheets. Turn over the baking sheet and peel the acetate sheet off the chocolate sheets. Set aside.
Back to the chocolate ganache. Make sure it’s set and ready to pipe. If it’s still too runny, put in the fridge for about 5 minutes. Once set, fit a pastry bag with an 8 mm smooth tip and fill it with ganache.
Pipe a bit of ganache on each dacquoise rectangle and place a dark chocolate sheet on top of it. If the chocolate sheet looks slanted, fix it by piping some more ganache under the sloping area to straighten the sheet. Pipe 2 rows of drop-shaped ganache on top of the dark chocolate sheet. Allow to set for about a minute or two and then place a milk chocolate sheet on top.
Back to the milk chocolate chantilly. Remove from the fridge and whisk by hand until you get a yogurt-like texture. Be careful not to over whisk, otherwise the cream might separate or become grainy while piping. Here’s how you know it’s ready: throw the batter from the whisk back to the bowl. If it flattens immediately, Whisk a little more. If it takes time to flatten, it’s ready.
Fit a pastry bag with an 8 mm smooth tip and fill it with chantilly. Pipe 2 rows of drop-shaped chantilly on top of the milk chocolate sheet. Allow to set for about a minute or two and then place a white chocolate sheet on top.
Decoration
Temper white chocolate. It might be difficult to temper such a small amount of chocolate without “mycryo” powder. Either temper a larger amount using a different method and just store the remaining chocolate, or just choose a different type of decoration.
Once the chocolate is tempered, grab a hazelnut (tweezers are a big help here) and dip half of it in the melted chocolate. Place the hazelnut on top of the white chocolate sheet. Hold for a bit until the chocolate sets. Store the plaisir sucré cakes in the fridge in a sealed container until it’s time to serve.


Hi 🙂 is it possible to freeze the decqouize with the crunchy layer for future use?
Mmm, I am actually not sure about it. I usually just eat it all up. The crunchy layer can be definitely frozen. I also don’t see a problem with freezing the dacquoise. So, it might work out, I just never tried it and don’t have enough info to tell you for sure.
I made this recipe and it turned out just prefect! Thank you for sharing.
Thank you! Glad to hear you liked it 🙂
waooo… this is looking yummy please guide us to different egg less cake for our bakery, we want to serve best quality cakes for our costumers. Thanks
Thanks! Hopefully in the future 🙂
How far in advance can these cakes be made? Or how far in advance could you make each of the constituent parts?
Hey Kristin!
The cakes are best within the first 2 days, but they keep well enough for a few days more in the fridge. It could be a hassle to make everything within a day, that’s why I usually make it easy on myself and prepare the chocolate sheets a few days in advance (if stored properly, you can actually make them weeks in advance).
Other than that, the chocolate milk chantilly should be made the day before. The rest is best prepared the same day for maximum freshness. I hope this helps.
Nice!
Thanks! 🙂